Monthly Archives: January 2016

Abbreviations

Saturday is kind of a ‘wordy’ day for me as it’s the day that I tackle the cryptic crossword in the National Post.  There are cryptic puzzles throughout the week, but I like the one constructed by Henry Rathvon and Emily Cox. Sometimes I can crack it in one sitting, usually I work at it throughout the week.

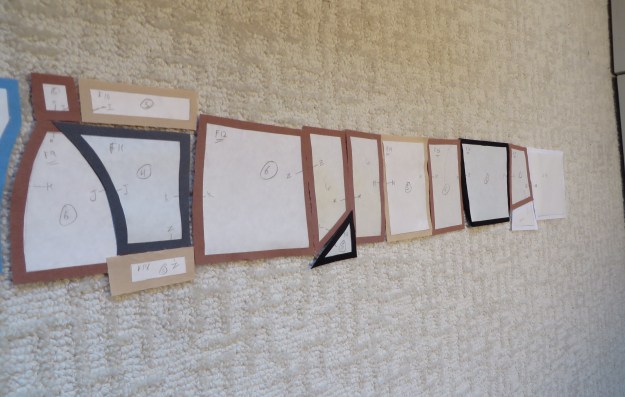
On the topic of words and language, I’ve been thinking about the abbreviations that have worked their way into my speech and writing.  For example, in my sewing room right now I have two UFO’s, several WIP’s and I’m about to start some FMQ on one of the WIP’s!   The UFO’s are UnFinished Objects.  They differ from WIP’s (Works In Progress) in that they’re tucked away and haven’t seen action for several months.  I really am working on the WIP’s.  The FMQ,(Free Motion Quilting), will get me very close to finishing one of those projects.  And, when I’m in need of supplies, I’ll check out my LQS, or Local Quilt Shop.

Abbreviations come into play in my sporty life too.  Recently I signed up to race in the Ironman triathlon 70.3 race in Victoria in June.  The distance is one-half of a full Ironman race, (140.6 miles), but instead of calling it a ‘half Ironman’, it is often referred to as a 70.3.  Training has begun and that means it’s time to focus on my DPS, RPM and to throw in a weekly LSD run.  DPS is Distance Per Stroke.  Swimming is all about technique and greater DPS means fewer strokes, which equals less fatigue.  RPM is for the bike and it is the number of Revolutions Per Minute the crank is turned.  The LSD run has nothing to do with psychedelic drugs!  Rather it’s a Long Slow Distance run, which is now 10 km, but will build to 20 km in the spring.

I love words and language.  And right now I’m going to exchange today’s WIP for the cryptic crossword and a cold beer.

Bye for now.


Advertisement

Inspiration and Ideas are Everywhere

This project, which is called ‘Pixel’ was completed in the summer of 2015.  I’d had the idea for a while, after thinking that the Kleenex box would translate nicely into a fabric wall hanging.  The squares were cut at 4 1/2″, allowing for 1/4″ seam allowance, and the finished hanging is approximately 36″ x 41″.  I sewed the horizontal rows first and then joined them from top to bottom.

I had originally thought about adding a version of the Kleenex logo and polled my friends for their thoughts.  The nays won, hands down, so I kept the black bar plain.  There is a hanging sleeve on the back and the metal rod runs through it, keeping it nice and straight.

Had I not seen the Kleenex box, I would never have considered throwing all those colours together, even though I like them all individually.  This was an eye opener for me and I now usually have my camera or iPhone with me to snap other ideas.  Here are a few shots that might inspire a project one day.  If you hover over the bottom of each picture you’ll bring up a description.

Thanks for reading!

Pink Floyd Three Ways


When I had made a few quilts, and decided that it was something that I’d like to carry on with, I mentioned to my two children that I’d love to make them each a quilt.  It had to be something that they chose and, ideally, I hoped that they would participate in the making.  That’s my practical side coming through – a quilt is a lot of work and I wanted to know that it would be loved and appreciated.

My son came up with an idea but was hesitant to share it with me, as he felt it was a tad complex.  “Tell me,”  I said, “how hard can it be?”  Braden gave in and told me that he wanted a quilt that looked like the cover of Pink Floyd’s Dark Side of the Moon album.  This one:

images

Not one to shy away from a challenge, I thought it would be fun to take this on.  Together we drew, shopped, measured, cut and pieced.  The black background is strips sewn together.  They’re either 4″ or 6″ wide, (I can’t remember and the quilt isn’t here). We cut the background and inserted the white band and the rainbow.  The centre triangle is black in the middle with graduated greys on the perimeter.  It was made separately and then sewn on.  We were super happy with the result.

Little did I know that the complex part of the quilt was yet to come.  This had all been just a warm up exercise!  Check out the photo of Pink Floyd’s Wish You Were Here album cover.  This one:

Pink-floyd-cover-1

Yup, Braden wanted this on the flip side of his quilt.  How did  we do it?  Slowly, thoughtfully and with a great deal of patience.  Braden made a full size 6′ x 6′ drawing, which we divided into 4″ horizontal strips.  Each strip was traced onto freezer paper, then numbered and colour-coded, so we’d know what pieces to join together.  Here’s what one strip looks like:

IMG_3659

We added 1/4″ for seam allowances and then stitched each horizontal row together.  We pressed each seam as we went along and there were several instances of ‘unsewing/resewing’, especially with the small, curvy pieces.  As each horizontal row was completed we added it to the one above, to make sure we were on track.  Here’s a photo of the first few assembled rows:

IMG_3655_1024

It was very fun to watch as it all came together.  Braden added the jagged side edges and I think it makes a unique statement.  Once the top was assembled we made appliqués of the two men and fused them to it.  The appliqués were then stitched on using a satin stitch.

We cleaned up the loose threads, straightened the edges, layered it into a quilt sandwich and  decided to carry on with the Pink Floyd theme and quilt it  like the cover of The Wall, this one:

images


Braden had helped with all aspects of the design and construction of this project.  But, by the time we got ready to quilt it, he had to move away for work.  I got the quilting done and finished it off with a narrow black binding and a label.

What a sense of satisfaction!  Sure, there are lots of things that I’d do differently, so as a learning experience it was invaluable.  Best of all, it was a way to spend time with Braden; problem solving, sharing my craft with him and creating memories.

Click on any of the photos below to get enlarged views of the finished quilt.


The Girlfriend Quilt

I met Cheryl and Laura when our family moved to Victoria in 1969.  We immediately became friends and have stayed best pals since then.  Even though they live in Victoria and I’m in Vancouver we see each other often.  Our husbands are close friends as well and we all get together for a couple of weekends each year.

Each summer the six of us gather at our home on Denman Island for a weekend. We often do a craft on those weekends.   In 2014 I wanted to do a special project with the girls – a Girlfriend Quilt.  The instructions were for each of us to purchase six fat quarters, (18″ x 22″ pre-cut fabric pieces).  They could be anything that we liked, even if they didn’t go together, and could include one solid colour.  No shopping together, and no sharing; this was to be a surprise.

I pre-cut the background strips, based on what the girls told me they’d like.  When we were together we revealed our fabrics, cut them into 4 1/2″ squares and began to place them according to a pattern that I’d drawn up.  This was the fun part because the ‘rules’ stipulated that we had to use at least one of all of the fabrics.  Our tastes are very different.  Cheryl loves muted tones. Laura loves bright and bold colours and I tend toward the unusual novelty pieces. It was hard to imagine how this variety of choices would look together.

Fast forward another month or so and the three quilts had been pieced, quilted and bound.  I have to say that they surpassed my expectation.  They look great and the girls love them.  I have a vision of the three of us, in 30 years, sitting with our Girlfriend Quilts wrapped around our legs and laughing like we have for the past 46 years.


First Finish of 2016

IMG_5050

I’ve just thought about my title and realize it sounds as if I view quilting as a type of competition or race.   Not true at all, or is it?  My aim isn’t to become a prolific quilter and turn out dozens of quilts in a year.  This hobby is teaching me to be patient and to enjoy all aspects of each project – planning, cutting, piecing, quilting and binding.  However, no matter how patient I become, I will always be goal-driven and finishing a project will always have a wonderful feeling, which, for me, is so similar to the feeling of crossing the finish line in a running race or a triathlon.  So, I guess it’s kind of the same, but in a different way.

This quilt, as yet unnamed, started as a pre-cut kit that I bought at the National Quilting Association show in Little Rock, Arkansas last spring.  The 50+ squares were cut at 10″ and the pattern was Japanese Jigsaw.  When I got it home and started reading the instructions I discovered two things.  One, I didn’t really like the finished quilt and two, there would be tons of scraps/waste if I followed the pattern.  So I decided to use 42 of the squares and placed them in such a way that I liked.  I pieced them and then added a very narrow red trim line between the blocks and the border.  This brightened it up and tied the front to the red batik backing.

This was my first go at Free Motion Quilting a large project and it was so much fun.  I’ve practiced on lots of little scraps and bits, but felt a need to ‘just do it’.  Each different block pattern is quilted differently. Patterns include pebbles, meandering, spirals, clamshells, cross-hatch and flame stitch.  The fabric is busy and unstructured and very forgiving – a great piece to learn on.  I bound it in a grey fabric that picked up the greys, black and white in the body.

Here’s the finished quilt, hanging on the fence.  Good timing, as the next day there was 3 inches of snow!

A Grand Day


IMG_1967

Last night we had our final big meal of the holiday season – a beautiful standing rib roast with Yorkshire Puddings and all the trimmings.  That meant today’s slate was free.  I could do whatever I wanted, or I could choose to do nothing at all.  The latter isn’t my style so I mixed it up a bit.

I went for a lovely run alongside the ocean, early enough that I saw only two cars.  It was just 6km and maybe cancelled out 1/2 of a Yorkshire Pudding.  I spent some time on the cryptic crossword and made good progress.

Then I hit my sewing room for an hour or two of stitching while our son hung a quilt rack on the wall.  I’m working on a Postage Stamp Quilt, made entirely of 1 inch squares.  The first 16 square inch block is now complete.  It’s a perfect project to pick up whenever I feel like sewing, but don’t want to tackle something intricate or complicated.

Now it’s getting dark and it’s time to turn on the Christmas lights for the final time this season.  Onwards to new adventures in 2016.

IMG_1964


SWIM

Happy New Year!  I think I’ve got the blog organized to the point where I can start making regular posts.  There will be lots of tweaking as time goes on, but let’s get started.

I began sewing in junior high school.  My Mom and Grandmother were both accomplished sewers, knitters and needle-pointers, so it was no surprise that I carried on with fabric-type crafts.  I took home ec in high school and remember being called to the office to explain why my flannelette had hockey players on it, instead of fairies, princesses or other more feminine designs.  Dare to be different, think outside the box – both describe my persona.

This seems to have carried over to my new love of quilting.  I want to use my imagination to create and don’t want to be restricted to a pattern.  The quilt in the photos above was the sixth that I’ve made.  I swim a lot in a pool.  One day, while doing laps, I realized that the tiles on the bottom of the pool were laid out just like a quilt.  I began collecting blue fabrics with a watery look.  Armed with a large sheet of graph paper, a metre stick and some coloured pencils I drew up a scale version of three lanes of a swimming pool, complete with lane dividers.

The fabric was cut into 2 1/2″ squares, sewn together into rows and then the rows were joined together.  It didn’t look like much for a long time, but gradually it began to look like what I’d envisioned.  I added a white border, used a mixed blue backing and a black binding.  It’s machine quilted with a horizontal wavy pattern.

I think this is my favourite quilt so far because it is an own-design that reflects my love of sewing and swimming.  It’s very different and definitely outside the box!