Tag Archives: ideas

Seeing Spots!

Laura’s name has come up in a previous post –  The Girlfriend Quilt .  You’ll also find her, and her husband Greg, in the blog that I kept while we travelled through India in 2013 –https://samosasojourn.wordpress.com  We met at Willows Elementary School in Victoria in September, 1969, and have been great friends since then.

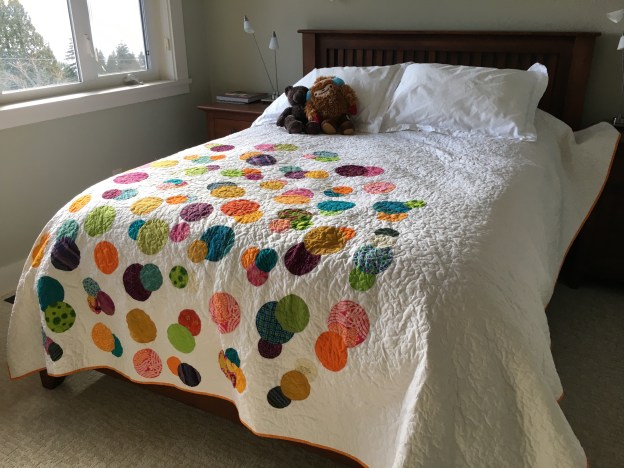
Last year I offered to make a quilt as a housewarming gift for Greg and Laura’s new home on Shawnigan Lake.  We looked at many different quilts on Pinterest, in books and in magazines.  Finally, we found a photo of a quilt, by Zen Chic, on Pinterest – lots of bright coloured dots on a white background.

The background is a solid white cotton that I purchased at Fabricana.  I pieced it to make it queen-sized.  The dots were a multi-step process.  First, we chose fabric in colours that reminded us of our trip to India.  Many of these fabrics were remnants from “Delhi Dreams” Start To Finish #6 – Done!  Then, I cut the dots in three different sizes, using plates and bowls as my templates!  The dots were sewn, right sides together, to fusible interfacing.  I cut a small slit in the interfacing and turned the dots so that they were right sides out and fused them to the white background.  Each dot was then edge stitched to ensure that they would stay attached.  Then, to cut down on bulk, I cut away any excess fabric from behind each dot.

The back of the quilt is the same white fabric as the front, with just a few dots.  The batting is bamboo.  I quilted this on my Husqvarna domestic machine using Superior King Tut thread in ‘Temple’.  It’s a meandering pattern that was fun to do and looks great with the dots.

We originally wanted to use white for the binding, but decided that it needed some contrast, so I chose an orange/yellow/gold fabric that sets the quilt off well.  The binding is attached by machine to the quilt front then pressed and folded over towards the back.  Normally, I would hand stitch the binding, but the 400″ perimeter seemed daunting, so I finished it by machine.

The final step was to choose a name and make/attach a label.  I enlisted Laura’s help and we came up with all kinds of silly possibilities.  In the end, and as a joke, Laura suggested “Laura’s Quilt”.   Seemed perfect to me!

fullsizerender-3

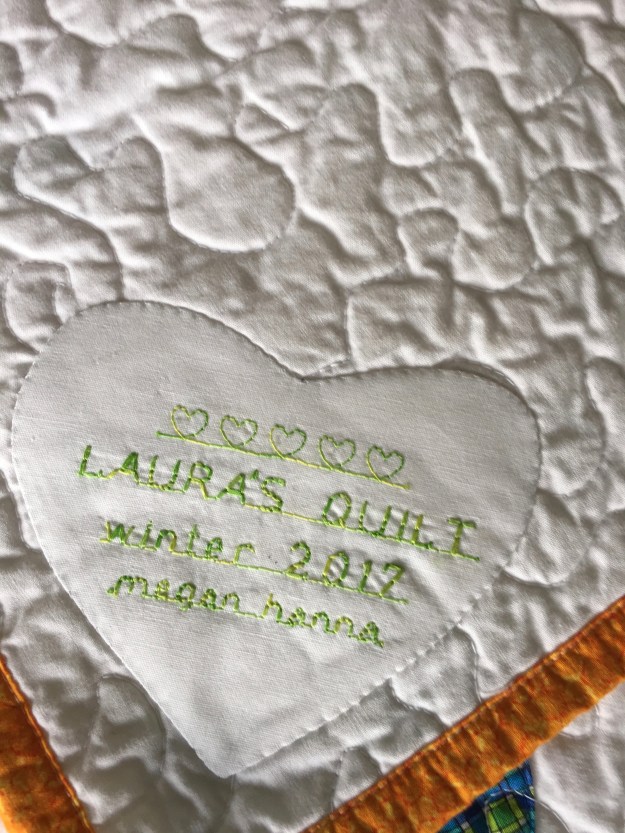
“Laura’s Quilt” was made with love and with countless memories of 46+ years of friendship.  Curl up, snuggle and enjoy!

Thanks for reading.  Happy Saturday!

Advertisement

Front Page

In previous posts I’ve mentioned that I love words and language.  For a long time I had an idea of making a quilt that had the look and feel of a newspaper page.  For several months I collected fabric with text and interesting images and then began drawing up a pattern on large sheets of 1″ graph paper.

Once the pattern was done I began the fun work of cutting out the pieces.  I paid attention to colour balance and made sure that repeat pieces weren’t too close together.   Each piece was labelled with a number that corresponded with the graph paper pattern, then trimmed with a narrow cream border.

Assembly took place at the Denman Quilters’ Retreat on Thetis Island, in 2014.  Most of the blocks went together easily and in a logical sequence.  With some I had to sit back and think ‘what goes where, and when?’  Gradually it came together, but it felt to me that something was missing.  Fortunately there was enough leftover red text fabric to add a border.

The backing fabric was narrow and required a seam.  To disguise the seam I used leftover strips from the front of the quilt.    If you enlarge the photo of the backing you’ll see that the left side black/cream is all one piece but the right side black/cream is made of many horizontal strips sewn together.  Because the print is so small those seams appear less obvious.

The quilting is a series of fractured, random straight lines.  I thought this would be quick and easy, but soon found that that was not the case and I had to keep adding lines to make sure that the unquilted spaces weren’t too large.  The border is plain black, attached by machine and finished by hand.  The finished size is 62″ x 72″.

While there are things that I would do differently, I was really pleased with how this quilt turned out.  There’s a large stack of text fabric in my stash and a companion quilt is not out of the question.  Here are photos of the front and back of Front Page.

Thanks for reading.

Start To Finish #1-The Idea

IMG_2141

My slate is almost clean and I feel that I can comfortably start a new project.  The timing is perfect as it’s just three weeks until our guild has its annual quilt retreat.  I’ll post more on the retreat later, but basically, it’s four days where all we do is quilt, eat and sleep.

I like to go to retreat with my project planned and my cutting done.  With 40 women, you can imagine that there’s lots of distraction; not always conducive for concentrated thinking.  We will have shared cutting tables set up, but I wouldn’t want to hog one of these by cutting a whole quilt.

This post is the first in a series that will follow a quilt from idea to completion.  Each post will be titled ‘Start To Finish’ and will be numbered.  You will be able to go back to previous posts via the Archives.

Since visiting India in 2013, I’ve wanted to make something that reflects the colour and chaos that surrounded us.  Here’s a link to the blog that I kept during that trip:  Samosa Sojourn .  I’ve been collecting fabrics and tossing ideas around.  Yesterday I laid out the pieces that I’ve found, then I culled the ones that didn’t work.  It’s a good collection that includes brights from saris and markets, greens from tea plantations and rice fields, rusts  and greys from the soil and the buildings.

I’ve been having trouble deciding how to put all these fabrics together.  I want there to be  confusion and busyness, as that’s how India is.  But, there’s also such calm and beauty – how to represent that?  I thought back to an own-design quilt that I made last year.  (You can see it if you click ‘Finished Projects’ on the right side of the blog, it’s called Read Between the Lines.)  It uses three different strip widths – 2″, 4″ and 6″. My mix of fabrics includes several muted solids and I hope that these will add a touch of calm to the riot of colour.  To spice things up a bit I’ll add some random, narrow vertical inserts.  With the amount of fabric that I’ve collected I should be able to make a king-sized quilt.

What a relief to finally have a plan.  Now it’s time to get the fabric washed and the strips cut out.  Can I wait 21 days to get started???

Thanks for following.


Inspiration and Ideas are Everywhere

This project, which is called ‘Pixel’ was completed in the summer of 2015.  I’d had the idea for a while, after thinking that the Kleenex box would translate nicely into a fabric wall hanging.  The squares were cut at 4 1/2″, allowing for 1/4″ seam allowance, and the finished hanging is approximately 36″ x 41″.  I sewed the horizontal rows first and then joined them from top to bottom.

I had originally thought about adding a version of the Kleenex logo and polled my friends for their thoughts.  The nays won, hands down, so I kept the black bar plain.  There is a hanging sleeve on the back and the metal rod runs through it, keeping it nice and straight.

Had I not seen the Kleenex box, I would never have considered throwing all those colours together, even though I like them all individually.  This was an eye opener for me and I now usually have my camera or iPhone with me to snap other ideas.  Here are a few shots that might inspire a project one day.  If you hover over the bottom of each picture you’ll bring up a description.

Thanks for reading!