Category Archives: Quilts – Their Stories

Fallen Stars

Hello!  It’s Easter Monday and, for me, it’s a day of tidying up loose ends.  The list isn’t terribly long and I’m optimistic that I can cross off several items.

Several months ago I entered my name into a fabric challenge, put on by Riley Blake fabrics.  The rules for each challenge differ and for this one I just needed to use the fabric that I was given and create something quilted, by April 30.  The fabric line is called Rockstar and my pieces were orange, white and aqua.

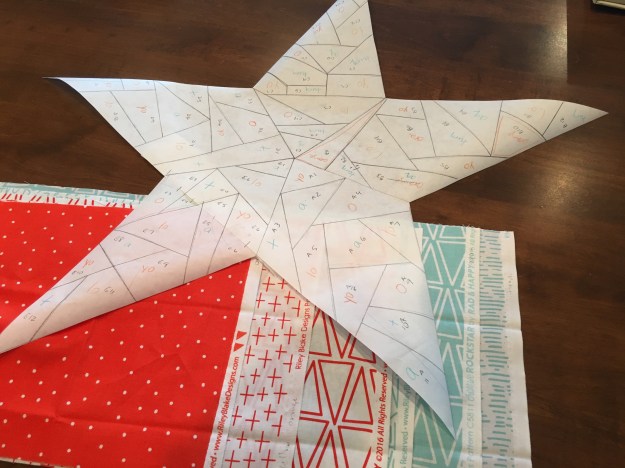
I was awed by the Best in Show quilt at QuiltCon in Savannah,  (See post here – QuiltCon 2017.) so decided to try my hand at paper piecing.  Hmmm, how to draw a star?  Freehand didn’t look so great.  Thankfully, Google and YouTube came to the rescue!  Once I had the star, I broke it into smaller pieces and assigned each piece a number and a colour.  Hopefully this would help me get it all back together in fabric.

IMG_4593

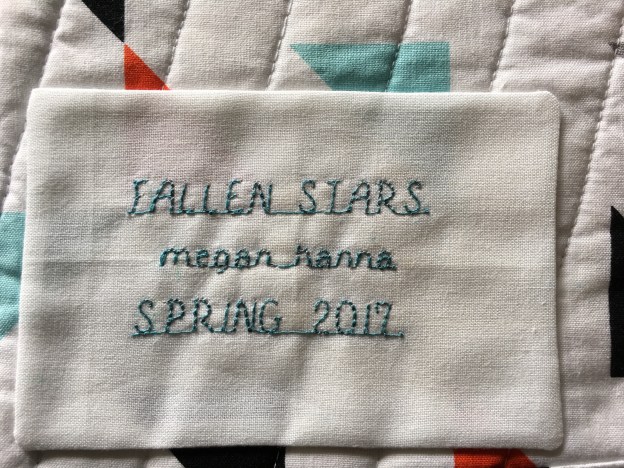
Once the fabric star was pieced I machine-embroidered the names of my favourite Rock Stars who are no longer with us.  Leonard Cohen, Michael Jackson, John Lennon, Janis Joplin, Jim Morrison plus several others are stitched on in silver thread.  The silver is a bit too subtle and I’d use a stronger contrast another time.

The finished star was then appliquéd onto the black background.  I quilted the star with a mix of straight lines and triangle shapes.  The quilting on the background mirrors the shape of the star.  The batting is 100% cotton and the quilting thread is Superior King Tut in Temple.  The piece has a one inch facing instead of a binding.  It measures 32″ x 32″.  Here’s a photo.

FullSizeRender

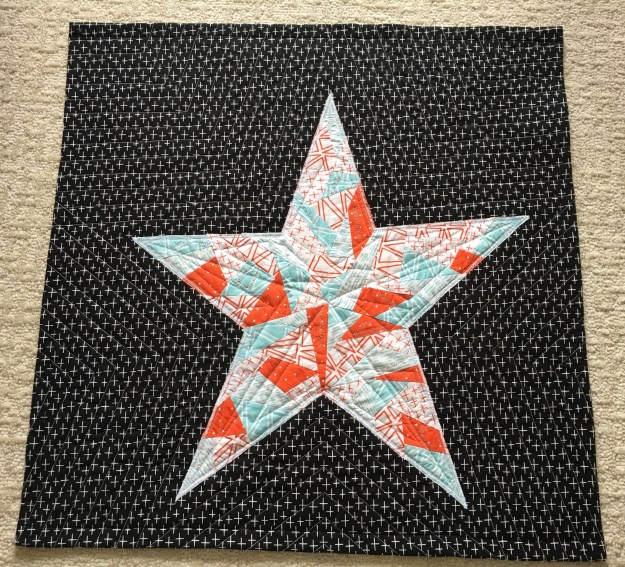
It’s not meant to be centred, if you’re curious!  Also, the background fabric didn’t come in my package so I had to purchase it.  It never dawned on me, until I got it home, that the white marks look like cemetery crosses – kind of fitting!

This is my third challenge piece and I don’t expect it to be prize-worthy in the judges’ eyes.  However, I enjoyed having to use my imagination and I acquired some new skills along the way.

Now for the next thing on my list – cleaning out my thread cabinet.  Now that’s a challenge!

Thanks for reading.

Advertisement

Seeing Spots!

Laura’s name has come up in a previous post –  The Girlfriend Quilt .  You’ll also find her, and her husband Greg, in the blog that I kept while we travelled through India in 2013 –https://samosasojourn.wordpress.com  We met at Willows Elementary School in Victoria in September, 1969, and have been great friends since then.

Last year I offered to make a quilt as a housewarming gift for Greg and Laura’s new home on Shawnigan Lake.  We looked at many different quilts on Pinterest, in books and in magazines.  Finally, we found a photo of a quilt, by Zen Chic, on Pinterest – lots of bright coloured dots on a white background.

The background is a solid white cotton that I purchased at Fabricana.  I pieced it to make it queen-sized.  The dots were a multi-step process.  First, we chose fabric in colours that reminded us of our trip to India.  Many of these fabrics were remnants from “Delhi Dreams” Start To Finish #6 – Done!  Then, I cut the dots in three different sizes, using plates and bowls as my templates!  The dots were sewn, right sides together, to fusible interfacing.  I cut a small slit in the interfacing and turned the dots so that they were right sides out and fused them to the white background.  Each dot was then edge stitched to ensure that they would stay attached.  Then, to cut down on bulk, I cut away any excess fabric from behind each dot.

The back of the quilt is the same white fabric as the front, with just a few dots.  The batting is bamboo.  I quilted this on my Husqvarna domestic machine using Superior King Tut thread in ‘Temple’.  It’s a meandering pattern that was fun to do and looks great with the dots.

We originally wanted to use white for the binding, but decided that it needed some contrast, so I chose an orange/yellow/gold fabric that sets the quilt off well.  The binding is attached by machine to the quilt front then pressed and folded over towards the back.  Normally, I would hand stitch the binding, but the 400″ perimeter seemed daunting, so I finished it by machine.

The final step was to choose a name and make/attach a label.  I enlisted Laura’s help and we came up with all kinds of silly possibilities.  In the end, and as a joke, Laura suggested “Laura’s Quilt”.   Seemed perfect to me!

fullsizerender-3

“Laura’s Quilt” was made with love and with countless memories of 46+ years of friendship.  Curl up, snuggle and enjoy!

Thanks for reading.  Happy Saturday!

4761

Correction from a previous post in which I said that the finished postage stamp quilt would have 4,791 pieces.  In fact, it’s ‘only’ 4,761!  And, it’s all done!  This quilt has been in the works since last Christmas and has been a fun thing to pick up and work at in between other projects.

There are 16 blocks of 16 x 16, or 256 1″ squares.  The pieces were drawn randomly from a large bin.  If I grabbed two that were the same I swapped one out, but otherwise there is no pattern.  I joined the pieces in twos, then made those twos into fours.  Next, I took four of the fours and made them into a block.  These blocks were trimmed to 4 1/2″ square.  Usually I set out to make eight of these squares in one setting.  When I had 16 of them I made them into the 16 x 16 block.

The iron was busy throughout; there are so many seams!  It took some experimenting to find the best pressing pattern.  For instance, all of the four piece strips are pressed to one side and then they nest well when joined.  In places where there is a lot of bulk the seams are pressed open.  Here’s a photo of a section of the back of the quilt.  It looks crazy, but there was a method!img_2894

The sashing is more of the 1″ pieces, all cream with text.  Once the sashing was on I felt that it needed a border so added a narrow strip of Moda Grunge in grey.  This quilt has enough going on, on the feature side, that I felt the back should be pretty calm.  At The Red Barn in Courtenay I found an extra-wide black fabric that has the names of colours written in white.  As it was extra-wide I didn’t need to piece it and I thought the colour names fit perfectly.

I used Superior King Tut thread, in gold, red, orange and grey for the quilting and did a series of wavy lines that run from side to side over the small pieces.  The border is quilted separately with five narrow lines, using the same thread colours.  The binding is a black cotton with white dots of various sizes.  It was attached by machine and finished by hand.  The label went on and then the quilt went through the washer and dryer.  I’ve been using Forever New detergent for my quilts and love the way it makes them feel and smell.

This was a very fun project and I’m thrilled with the end result.  It’s just a riot of colour!  Here are front and back pictures of 4761.  Click on the picture to enlarge.

img_3229

img_3237

Thanks, as always, for reading!

Christmas in July

It’s not really Christmas, although the summer weather has been a bit chilly this month.  We’ve seen single digits, lots of rain and some high winds.  Today is a perfect day for the 5th annual ‘Ewe da Best’ golf tournament, which is held on a local sheep pasture.

Last summer I participated in my first webinar, called ‘Wedge Quilts Go Modern’.  It was put on by the Modern Quilt Guild and the instructor was Christina Cameli.  Christina showed us how to use a wedge-shaped ruler to cut strips of fabric.  Yes, it could be done without this tool, but it would be more difficult and I don’t think the results would be as accurate.  We learned how to join the strips and ways to work with the hole created in the centre of the strips.  (In my quilt the white circles fill in that hole.)The webinar also covered making pieced strips, fractured strips and negative space strips.  Webinars are a terrific way to learn a new skill, without having to leave home.  You could even be in pj’s having a glass of wine!  Here are some wedge rulers.
M-004-trio-lineale-doheny

Without an end in mind, I made the three circles last fall.  Then they sat.  After a couple of months I added them to a white background.  They are appliquéd on using the blanket stitch on my machine.  At the same time, I made the backing, using bits and pieces of reds, greens and whites.  I squared up the top and the backing and then put them away until May.  This is the second quilt that I’ve done this way and it seems that taking a break from them makes them exciting again.

I made a quilt sandwich with the top, the backing and bamboo for the batting, but wasn’t sure how to quilt it.  In the end, I started with the three circles and did a pebble pattern in each of the coloured spokes using Superior King Tut thread in White Linen.  The white spokes are not quilted so they puff out a bit.  The grid pattern is random and I used the same thread in Limestone, White Linen, Cheery Red and Holly and Ivy.  The binding is a great fabric that I stumbled on in Fabricland.  It doesn’t show well in the photos, but it’s Christmas candies in all of the colours that are in the quilt.  The finished quilt is approximately 60″ x 60″, perfect to curl up with on Christmas morning.  While I love it, I am going to put it up for sale in the Denman Island Studio Tour August 6 and 7.  Here are some photos; you can click on them to enlarge and see captions.

HO! HO! HO! and thanks for reading.

Something Fishy

Simplicity can be effective.  A couple of years ago I purchased a book by a gal named Casey York. The book is titled Modern Appliqué Illusions 12 Quilts Create Perspective and Depth.  The designs are quite simple, yet the finished quilts are eye-catching as they have a 3-D quality to them.

One in particular drew me in; it was called Ripples.  I loved it because it reminded me of the goldfish in our pond on Denman Island.  I’ve made this quilt twice in the past year – once as a wall quilt and once as a lap quilt.

The wall quilt went together nicely.  It had three koi, made from different orange fabrics.  I used a light grey cotton for the shadows and the same grey for the binding.  The backing was a bold orange and gold print.  I’d never done circular quilting and found it a challenge to start.  However, as the circles got larger, it was much easier.  I entered this quilt in the Denman Island Studio Tour last August and it sold quickly to a lovely girl who was working on Denman for the summer.

The lap quilt has five koi on it.  The backing is pieced and includes two blocks of Japanese koi fabric.  The binding is dark charcoal with white bubbles.  You would think that the lap quilt would also go together nicely.  After all, I’d ‘mastered’ the technique on the smaller one.  Well, that wasn’t the case.  I ran into a few problems and feel that it was because I was being so casual and not really paying attention.  I used the wrong product to adhere the appliqués to the quilt top.  This product is not meant for sewing as it gums up the needle and causes missed stitches and broken thread.  The circular quilting was more challenging because the quilt was larger.  There was another issue but I’ve managed to erase it from my memory!

This quilt was a gift for dear friends of ours who have a lovely home on the island of Hawaii.  And here’s something that really surprised me.  I wanted to send the quilt to Hawaii and had a three-week window to get it there.  I tried both FedEx and UPS and got quotes of approximately $130.  The FedEx clerk asked if I wanted it to go air or ground and, if I’d known there was a road to Hawaii, believe me, I’d have driven it myself!  Thinking those prices were just a tad steep, I stopped in to Canada Post.  Their quote, including the envelope, was $30.  BINGO!  Delivery was six days later.

I enjoyed making these two quilts and look forward to trying other patterns from Casey York’s book.  In the meantime, here are some photos of the finished projects.

Thanks for reading.

Restoring Order

I like it when things are in their place.  I’m not obsessive about this, but when things are where they should be there’s a sense of calm in my world.  Recently, in the book shops, I’ve picked up a book called the life-changing magic of tidying up: the japanese art of decluttering and organizing.  It’s a pretty book and a nice size too.  It’s a New York Times #1 best seller, written by Marie Kondo.  So, why don’t I buy the book and find out what the magic is?  Mainly because it seems to me that it would just add One More Thing that I’d need to declutter.

Three weeks ago I had some dental surgery done, and was instructed/ordered not to exercise for a week.  That week ended up being almost two weeks and then, just when I thought it was OK to get out there, I got a nasty cold.  Minor stuff, but I listened to my body and just hung about.  The benefit of this little break was having lots of time to clean up my sewing room and finish some niggly bits and pieces.

I got down to the bottom of my ironing bucket.  I finally sewed a hanging loop on my jean jacket.  Honestly, it took less than five minutes and I’ve put it off for two years!  I sorted fabrics that are leftover from three different quilts.  I put aside fabric and notions that will be donated or swapped.  I put hanging sleeves on my wall quilts so that they can actually hang and not spend their days in a pile on the floor.  Everything is labelled now.

This quilt, which was started over two years ago, was promised to Project Linus.  It will be my second donation to them.  Their donated quilts and blankets go to a transition house in North Vancouver.

IMG_5144

It’s free motion quilted with different patterns on each block and then a meander on all the white.  I hope that it brings comfort and joy to someone.

There is one more UFO, (unfinished object), waiting to be quilted and I’ve just ordered some thread for it.  I’m sticking to my goal of not buying any new fabric as my collection is full of wonderful pieces that are calling to be used.  And, this afternoon I began working on a lined linen blazer.  That fabric’s been around for a while, but linen is timeless, right!?

Yesterday marked five weeks until my Half Ironman race.  I’m definitely not where I’d like to be as far as training distances.  Three weeks off, at this point, isn’t recommended, but I had a good solid base and should be able to build up the mileage.

My mind and my sewing room have been decluttered.  Order has been restored and I can get excited again about new projects and spending time in the water, on the bike and on the road.

Thanks for reading.


Start To Finish #6 – Done!

The picture above was taken at sunset, from the roof of Colonel’s Retreat, a wonderful place to stay in New Delhi.

Previously I posted that I’d started quilting on the Indian – inspired quilt.  It took several sessions and sometimes I had to make myself take a break.  It really was fun and seemed to go quickly.  You may wonder how one would quilt something 6′ x 7′ on a domestic sewing machine.  A few months ago I wouldn’t have believed it possible, but it is.

I have a table with an opening that my machine fits into.  The machine is then flush with the surface of the table.  Behind that is another large table that supports the quilt as it moves away from me.  Finally, I move my large ironing board to my left and lower it so it’s level with my table.  It supports the quilt at the side.

The quilt ‘sandwich’ was pinned together with more than 400 pins.  Then I mentally divided the quilt into four quadrants and worked on one quadrant at a time.  Starting at the quilt centre I stitched vertically towards the bottom edge in approximately 8″ sections.  When the quilting was finished, I squared it off and added the binding, which was finished by hand.

I used a size 14 topstitch needle, switching in a new one at the half way point.  The thread, both top and bobbin, is Superior King Tut  ‘Shekels’, not ‘Sunflowers’ as I’d said earlier.  The backing is Moda ‘Grunge’ in colour Mustard.  The binding is also from the Moda ‘Grunge’ collection and is colour Gris Fonce.  The finished size is 74″ x 82″.

My thoughts, now that it’s done?  It looks just liked I’d hoped it would.  The colours are bold and bright, yet I don’t think it’s garish.  I love the backing and how it shows the swirly quilting.  And, in spite of all of the quilting, it’s really soft and cuddly.  I’m pretty sure that this is the quilt that I’ll enter into the Vancouver Modern Quilt Guild Showcase in August.

Oh, I’m still trying to come up with a good name for this quilt. But, in the meantime, here are some pix.

Namaste!

Waste Not, Want Not

My mother was ‘green’; reducing, reusing and recycling years before it was the thing to do.  We washed and reused foil, we reused paper lunch bags until they were ragged.  The oven only got turned on if there were several things to bake, lights were flicked off when we left a room and the dishwasher had to be really full before it was started.  We had a huge, braided circular rug that Mom made out of strips of wool yardage.

As a surly teenager I didn’t appreciate the importance of all of this.  In fact, I probably thought it was pretty uncool.  However, as soon as I left home, I tried to be as responsible as I could.  I use fabric shopping bags, favour products with minimal packaging, take the bus whenever possible, make my own granola and, yes, I wash and reuse foil!

When I got interested in quilting I said that there would be no ‘stash’ of fabric.  I’d only have what I need for the current project.  That didn’t work so well – the stash is excessive and now I’m back to buying only what I need for a current project.

A lot of scrap is created during the making of a quilt and I’m trying to find a use for all the bits and pieces.  Here’s a wall hanging that is made from the selvedges, or bound edges of fabric:

IMG_5109

The selvedges are always cut off before using a piece of fabric, as they are tightly woven and would cause the project to pucker.  Also, as you can see, they have writing on them – the name of the fabric, the designer and the mill where they were made.  For someone who loves words and language I find these fascinating and will continue to collect them.  This little hanging is about 24″ x 24″ and I named it ‘Salvaged Selvedges’.

I’ve also begun saving scraps of fabric, thread and batting and plan to use them as stuffing for a dog bed.  Still working on the logistics of that one, but I hope to have it figured out soon.  Tug thinks it’s a good idea!

img_2269

I’m happy to say that the Postage Stamp Quilt is well under way and it’s such fun to pick up and work on for an hour or so.  The finished size will be 64″ x 72″, or 4,608 pieces.  I’m really loving this project and it’s using up lots of little bits.  Here’s one block that is 16″ x 16″:

IMG_5047

It’s going to take a while to whittle down my stock of fabric.  I look at some of it now and wonder whatever possessed me to buy it.  Those pieces will go to a fabric exchange or to the Salvation Army and someone else can enjoy them.  Nothing new will be purchased and I’ll be left with an uncluttered place to create.

After I hit the ‘publish’ button on this post I’m going to spend some time organizing the  8,000+ photos on my laptop.  It’s a perfect job to do while watching the amazing Jordan Spieth as he heads toward a back to back win at The Masters.  Incredible golfer with such poise, and he’s only 22!

Thanks for reading.

Night For Life

I made this blue quilt last winter and donated it to a friend who was organizing a gala for the Canadian Transplant Association as a way to raise awareness and express gratitude.    My friend, Matt, had become very ill with an auto immune liver/bile duct disease called Primary Sclerosing Cholangitis, or PSC.  In the fall of 2014 Matt had a liver transplant, and received a portion of his cousin’s liver.  Both donor and recipient are doing well.

IMG_1433_1024

Night For Life

I’ve made this quilt twice and love its simplicity.  It’s fun to make and goes together very quickly.

I met Matt through an online group for people with PSC.  Yes, that includes me.  However, PSC affects people in many different ways and my doctors think that I will remain fairly healthy.

If you haven’t thought about organ donation, please do.  If you’re procrastinating about signing the card, please don’t!

Here’s a link to some good info about PSC.  Primary Sclerosing Cholangitis

Thanks for reading.


Collaborative Quilt

Creative Threads Conspiracy is a three-day event that happens on Denman Island every October.  The website for 2016 isn’t up yet, but if you’d like an idea of what goes on, you can click on this link, Creative Threads Conspiracy , from 2015.   I’ve taken part for the past two years and eagerly await the schedule for this year.

This past October I joined two workshops; Collaborative Quilts and Coptic Bookbinding.  Each workshop was a full day, lead by knowledgeable instructors.  For the quilt workshop we were to bring a box containing roughly 4 yards of fabric.  The fabric could be small bits, scraps and larger pieces, but they needed to work together.  I went with one of my favourite combinations of red, black, white, yellow and grey, with a few bits of text fabric thrown in.  I also had a 3″ x 3″ square of Linus, from the Peanuts cartoon.

There were 11, (12??) in the class.  We each started with our own fabric box and had 20 minutes to do the first block.  Then, every 20 minutes, the boxes and quilt tops were moved to a different person, who added her own touch and a surprise piece of fabric.  As the quilt tops got larger it became difficult to formulate an idea, cut it out and get it stitched on before the bell rang.

At the end of the day we took our pieces out into the sunshine and had show and tell.  The pieces were approximately 24″ x 30″, perhaps a bit larger and all were very creative.  Each person respected the work that had already been done and carried on the theme.

My piece got put into a box and tucked away.  Yes, it became a UFO, or UnFinished Object.  I had a few other things that I wanted to get done.  And there was Christmas, a trip to Hawaii, my Mom’s 90th birthday and, well, life in general.  Recently, I decided it was time to get this project finished and pulled the box out.

Having let it sit for almost three months seemed to breathe new life into it.  Where I hadn’t been in love with it, I saw possibility.  I did need to reposition and trim a wee bit in order to straighten it and make it a reasonable size.  I used some scraps for the backing and bound it with a black background/white dot fabric.  There’s also a small insert of text fabric in the binding.  The binding is attached front and back by machine.  A machine-made label sewn on to the back completed this project.

Oh, I forgot that I added five buttons for sparkle.  And, the best part, is the little insert along the bottom row that says ‘being partial to chickens roasted’.  Isn’t that just random and so much fun?!

It turns out that I love this little hanging as it makes me think of a great weekend of learning, sharing and working together.  I hope it brings a smile to your face as well.

Thanks for reading.